Stuart Farm

  • Our Story
  • Shop
    • Our Store
    • Where to Buy
  • Come Enjoy a Farm Stay!
  • Our Classes
  • Fertrell Products
  • Contact Us
  • Blog Posts
    • Our Animals
    • Mother Nature
    • Our Garden
    • Recipes
    • Farm Life
    • Projects
  • Consultation Services
  • 0 items

Grow Your Own Sweet Potatoes and Fall in Love!

Posted on February 15, 2014 Written by Serena 2 Comments

sweet potsI love sweet potatoes. I mean LOVE them! Mashed, baked, as fries, pies, covered in horrible marshmallows…it doesn’t matter, I want them.

So when I decided to grow my own, I searched the internet for ideas and hints. I found nurseries that specialized in SP slips…you know those vines that come off a SP when you suspend it in a jar of water? They are expensive and shipping will kill you. So I made my own. I wanted ones that were not treated with anything, so on a trip into the city I found some organic SP. Once you have your SP, it’s simple:
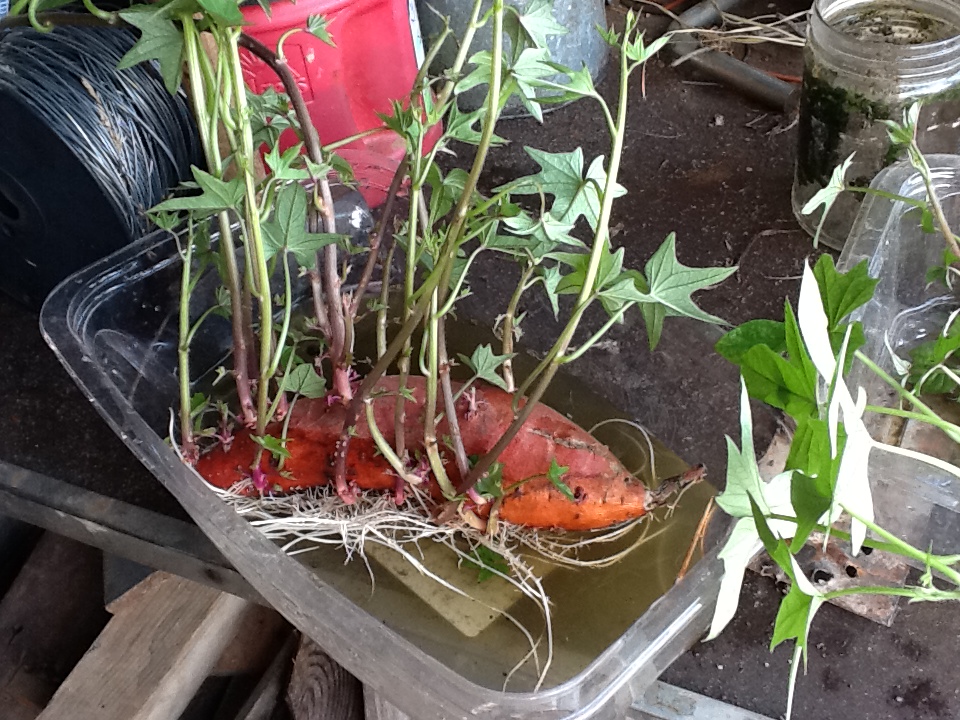
Half a sweet potato with lots of slips ready to be picked.

1–Cut your SP in half. In half lengthwise or widthwise doesn’t matter, you will just have to use different containers (read step two before you cut).

2–Stick some toothpicks in it so that the cut end will be submerged in a jar/container of water about half an inch. Make sure there is enough room around the rim of the jar for the SP to expand a bit…about 1/4 of an inch all the way around. You can also cut them in half lengthwise and place them in a shallow dish.

3–Wait for the vines to grow and maintain the water level. You can also add 1-2 tablespoons of compost to the jar for a nutrient boost.

4–Once the vines are at least 6 inches long, break them off as close to the SP as possible.

5–Place the vines in a shallow dish (a pie pan or plastic bakery container work well) and fill it with just enough water so the vines, not the leaves, are covered. You may have to add a weight like a rock or stick to hold them in the water. Make sure you space them out enough so that when it is time to remove them, the roots are not too tangled…approx. 4 inches apart.
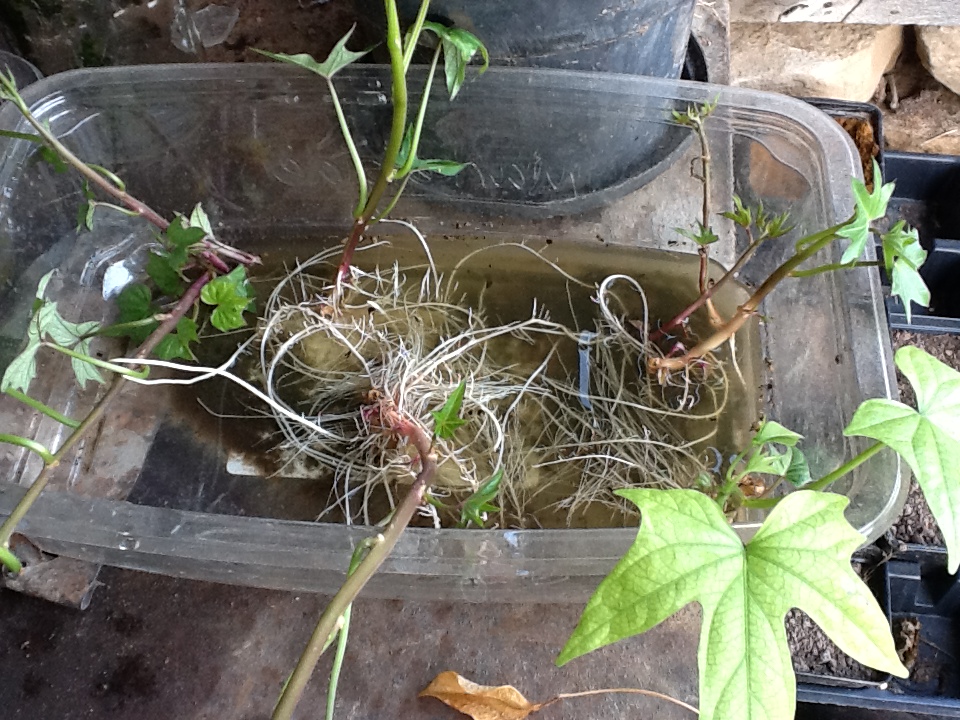
Slips in water.
Slips in water.

6–In a couple of days you should see roots start to form along the vine. Move to a pot and cover the roots with a little soil, maybe a tablespoon at a time. Keep doing this throughout the day until you have a mud consistency.

7–The next day, add a little more soil. Do not stir or disturb the roots.


8–The next day, add more soil. Add more water if it is too dry, but it should be like damp potting soil, not muddy.
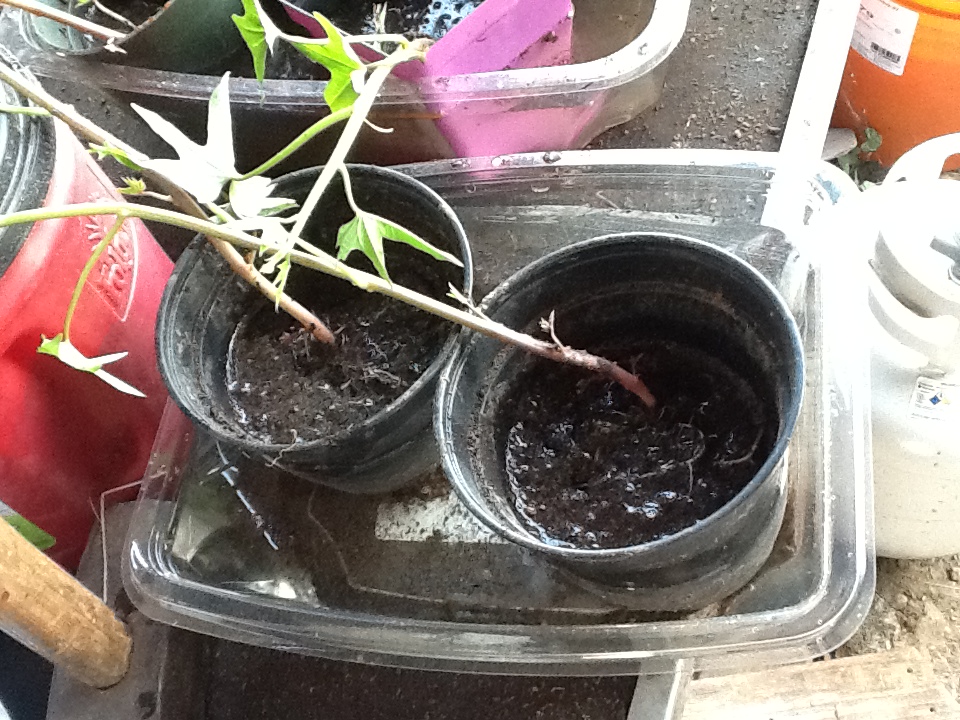
Adding soil and awaiting transplant.

9–Leave the slips like this for at least 2 more days. This is how it becomes accustom to being in soil instead of water.

10–When you are ready to plant, remove the slip with as much soil as you can, and gently transplant. You can transplant into the ground once soil temp is 70º F.  The looser the soil the better, but I grew my first crop in clay soil with some added compost.  Like most root crops, the least resistance the better.  Unlike regular potatoes, which SP are not related to, there is no need to hill up over the growing plant.

It is important to remember that the tubers grow under the main stem. Any vines that touch the ground will try to send down roots to turn into SP. If allowed to do this, the ones under the main plant won’t produce well and you will find lots of pencil sized SP along the vines. You can either occasionally go out and lift the vines, put down some heavy-duty weed block (maybe some cardboard sheets), or grow them on a trellis or in a pot. A trellis isn’t have to be fancy…2 pallets secured together on end to form a triangle and in a few weeks you won’t even see it. If you share your living space with deer, rabbit, sheep, or goats, make sure your plants are protected…they will tip-off new growth or take it down to the ground. If this should happen, curse and cry, but don’t pull up the plant! Side dress with about 1/4 cup compost 6 inches from the roots and water well. I did this with my plants the deer ate to almost nothing and they came back within a week.

The best way to remember how your SP will grow is by the A-F grading system. SP like it hot!!! So if it is 90-100 degrees, they are growing at a grade A. So then, B=80-90, C=70-80, D=60-70, and F=below 60. You don’t want them in the ground until the soil is above 70 degrees. They can tolerate drought better than most, but they still need at least inches of rain to produce a good tuber. One gallon of water a week equals an inch of rainfall. What I do is cut the bottom off a milk jug and turn it spout down and bury it about 2-3 inches into the ground and put a rock in it to keep it in place (earlier in the season you can use this for a mini greenhouse for your tomatoes, too). When it is time to water, I fill that up, give or take a bit, and know it has what it needs.

SP are harvested before the first frost here in Missouri. They take 100 to 140 days from planting to mature. If you are in the South, you may want to keep track of your planting and harvest date.
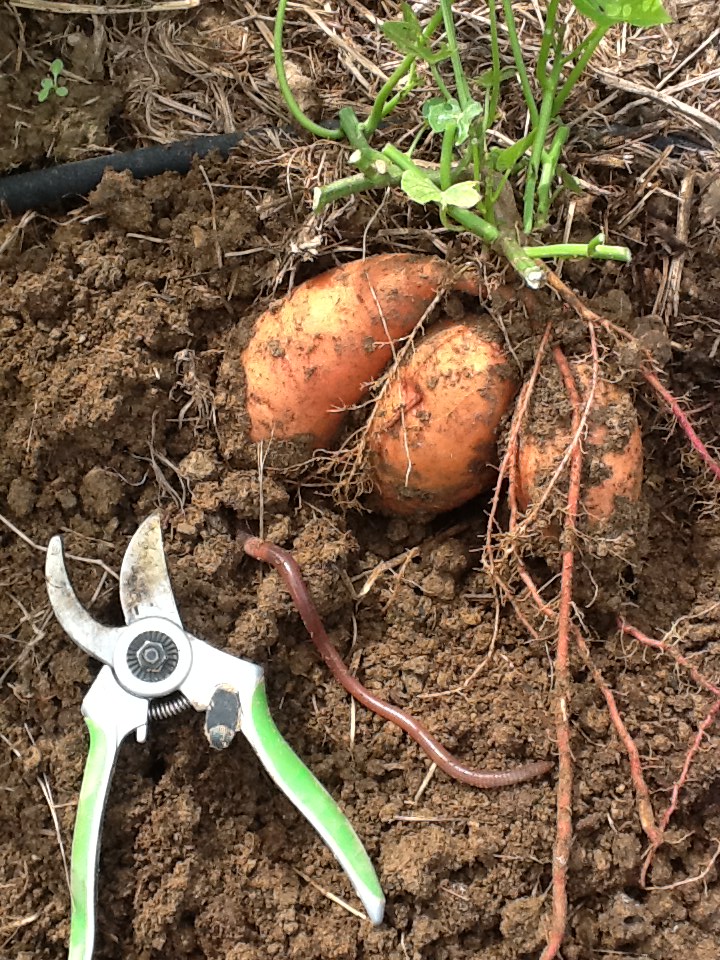
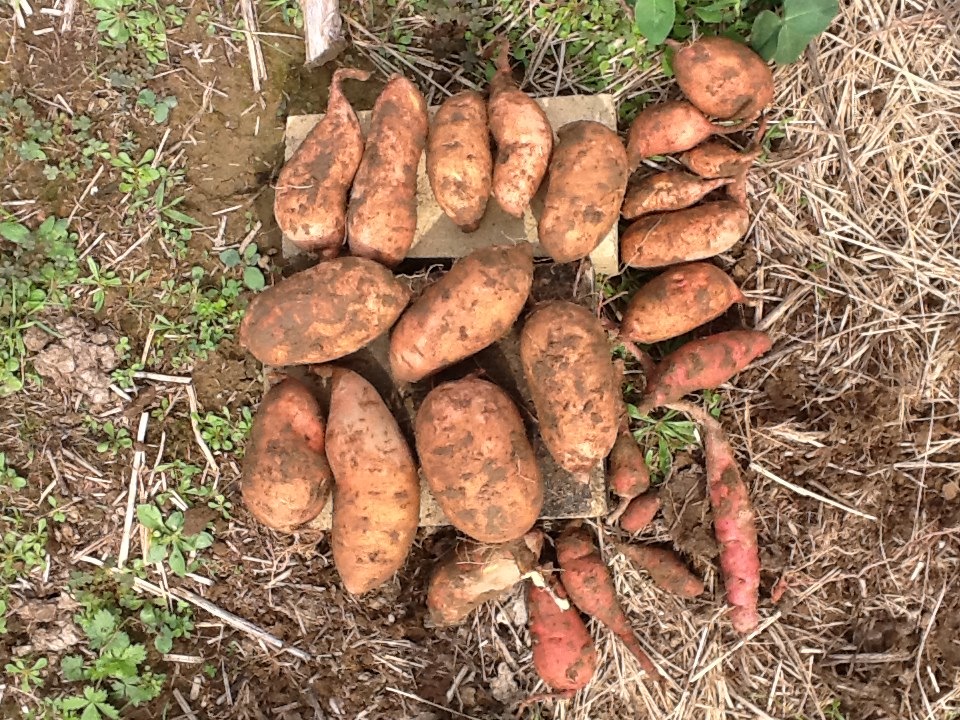
Nice harvest! (and a giant worm!)

Tubers are easily harvested by digging them up with a fork. Start about a foot away from where the SP are growing to be safe. Loosen the soil and move closer until you lift them up. Gently pull them up and separate them from the plant. At this point you can easily bruise or scratch the skin off, so LIGHTLY brush off the dirt and place them in a shady place outside for a few hours. When they are ready to come inside, again, lightly brush off the dirt and place them in a cool dark place for about 3 months. You want good air circulation around them so a single layer in a basket or wire rack works well. In this curing process, your SP are loosing moisture and condensing the sugars. Unlike most fruits and veg, a fresh picked SP is not what you what to eat. It must cure to become sweet. Three months is a long time to wait. But when you finally eat one, and realized what a sweet potato should taste like, you will fall in love. And then you will kick yourself for not growing more!


Filed Under: Our Garden Tagged With: garden

March…time to start on the garden!

Posted on March 7, 2013 Written by Serena 1 Comment

I’ve had my seed catalogs for a little over 3 months, and have been trying to narrow down what to grow. That may be as hard as the actual planting and growing. Last year, I grew 2 jalapeno plants. They grew well with little attention. But after harvesting upwards of 300 jalapeno and cutting and dehydrating them, I don’t think I need to grow them this year. But I WANT to grow them! They are so easy and so pretty. That is what is hard for me. Not growing what I don’t need, or in the case of swiss chard, what Fred won’t eat. Luckily this year we are getting pigs, so all the extras can go to them. But still, I must maintain some sense of control when it comes to planting. Or at least that is the plan.

I am moving our garden into the Flax patch now that the flax will be grown in the chicken oasis. Hopefully being closer to where we work, I will tend to it better. Fred gave the plot its last disking and it will be a no-till plot now. I am still learning about the whole non-till method. It is basically a way to keep your soil healthy by leaving the healthy plant residue in place and leaving it to rot. I use organic pest controls like organic pesticides like Bt and neem, picking off insects, trap crops, companion planting, or using row covers, instead of chemicals.

This month I am starting onions, broccoli, cabbage, and kale among others. I made a cold frame out of old windows a neighbor was throwing out. I covered the ground with cardboard and paper and piled horse manure on top of that. Once it starts to compost a bit, the heat should be enough to hold off any nighttime frosts. Hopefully, that will give me the jump start I need.

I am not big on technology. I like to draw out my garden by hand…creating and recreating what it should look like. But last year, Fred convinced me to get the Garden Plan Pro application for the iPad (you can find it at growveg.com and get in on your regular computer, too). I fought him on this and now I am not sure why. I love it! I do still doodle an occasional garden plot idea every so often, but I really love this program. I can list all the plants I want to grow and it gives me the correct spacing, how many plants can go in a given row or area, and what can and can’t be planted where the next year. And I have the option of using varieties from my favorite catalog…Baker Creek Heirlooms (rareseeds.com). So not only have I been pouring through my catalog repeatedly, I have been working and reworking my plans. In case you didn’t notice it…here is my official gold star, must have, go and get this app, seal of approval!

So what have I narrowed it down to? So glad you asked!

Amaranth–Golden giant

Arugula–Roquette

Beans–Red seeded asparagus beans, Tepary, Broad windsor favas, Calima

Beets–Sugar beets (for making sugar), Giant Yellow Eckendorf (fodder)Lutz salad, and Red Mangels (fodder)

Broccoli–green sprouting

Cauliflower–Snowball

Brussel Sprouts–Catskill, Churchhill

Carrot–Parisienne, Red Core Chantenay, Danvers half long

Chia–crown jewels

Collards–Champion

Corn–Broomcorn (for making brooms), Rainbow Sweet Inca

Eggplant —Rosita, Long Purple, Black Beauty, Listada De Gandia

Grains and cover crops—Flax, Buckwheat

Kale–Siberian, Forage, Marrow stem

Lettuce–Red leaf Romaine, Little gem

Melons–Green Nutmeg, American melon ananas

Okra —Eagle Pass

Onion—Brunswick, Red Globe, Southport Red Globe, Stuttgarter

Peppers– Padron, Hungarian Paprika, Pasila Bajio, Ancho, Jalapeno,

Peanuts–Tennessee Red

Radish–Sparkler, Voilet De Gournay

Rutabaga–American Purple Top

Sorrel

Spinach–Amsterdam Prickly, Tyee, Bloomsdale

Sweet potatoes–Jewel

Summer squash–Fordhook Zucchini, Lemon, Yellow Croockneck

Sweet peppers–Orange Bell, Sweet Choclate, Long sweet hungarian

Swiss chard–Ruby

Winter squash–Waltham Butternut, Baby blue hubbard

Tomatoes–Purple Russian, Royal Chico, Gold Medal, Amish Paste, Opalka, Mariana, Tomato cream sausage, Violet jasper

Turnip–Boule d’or, Purple top white globe, golden globe

Watermelon–Moon and Stars

Alyssum

Basil–Genovese, Red rubin, spicy, Lime

Bee balm

Borage

Calendula–Orange King, Triangle Flashback

Candytuft–dwarf purple

Chamomile–German

Cilantro

Cumin

Dill–Bouquet, Vierling, Fernleaf

Echinacea–Tennesseensius, Purpurea

Chamomile

Lavender

Lemon Balm

Lovage

Nasturtium

Oregano–Greek

Parsley

Rosemary

Salvia–Blue Monday sage

Sunflowers–Mammoth grey striped

Tansy

Yarrow

I promise you…this IS the narrowed down list! I went to a seed swap and got some there and some are leftovers from last year. I saw a statistic that said for every $100 you spend on seeds, you can get $1000 in food. Yes, that is justification at its finest. And, I must admit, while I chose these for their ability to do well in Missouri, some of them are from Texas (okra) or Mexico (tepary bean), and that did swayed my decision.

Along with rearranging the plots, I am trying some new things this year. I have been reading about growing melons and squash on trellises and will try that. I am also going to put my sweet potatoes on a trellis as well. That way they don’t root along the vines and try to produce tubers there. If you like sweet potatoes, I will post about making your own slips and growing your own–so easy! I am planting all of the flowers and herbs throughout the gardens to attract beneficial insects. I am going to make a few shallow watering holes for frogs, along with some houses.  When I put my tomatoes in the ground, I am going to plant them in a hole about 6-8 inches deep, and as they grow, cut the lower branches and pile the soil up around the stem.  Hopefully this will give them strong and deep roots.

I have saved our toilet paper and paper towel tubes and use those as pots. Just cut them in sections and set them in a plastic clamshell container…instant greenhouse! Use them for onions and beets as you can transplant the whole thing and not disturbs the root at all. I use cattle panels to trellis my tomatoes, but will do everything else with pallet trellises.

The garden is getting a good leveling and heaped with compost. By the time anything goes in the ground, the compost will have added lots of nutrients to the soil. I have been giving the girls their morning treat along the garden borders to get them to scratch around and clean up some of the grass and weeds. They do an excellent job!
Now this weather just has to cooperate and warm up a bit.


Filed Under: Our Garden Tagged With: garden

Welcome to Stuart Farm!

We’re Serena and Fred Stuart. While raising healthy and happy animals is our #1 goal, we’re also here to serve you! If you’re looking for help in navigating healthy eating and living, you are in the right place! We’re here to answer your questions and help you feed your family meat and eggs you can feel good about. We share farm stories that gives you a peek into our life, recipes to try, health tips, and more. We hope you enjoy coming along on our farm adventures.

Connect with us

  • View StuartFarmLLC’s profile on Facebook
  • View stuart_farm’s profile on Instagram

Contact Us

573-764-2324 please leave a message .
Farm hours are by appointment only.

Tags

Beef recipes broth chickens delivery Devons Dorkings Eggs Farm Life Freedom Rangers garden lard pigs Pyrs raw diet recipes recipes sweets Silver Fox Rabbits Sugaring

Categories

  • Blog Posts (73)
    • Farm Life (39)
    • Mother Nature (1)
    • Our Animals (24)
    • Our Garden (2)
    • Pigs (5)
    • Projects (1)
    • Recipes (16)

Recent

  • 2025-2026 Our Years of Transition
  • Our Farmstay Is Now Open!
  • The Best Way to Take Charge of Your Health
  • Love is…
  • My Summer Reading List

Archives

Copyright © 2026 · Focus Pro Theme on Genesis Framework · WordPress · Log in

Loading Comments...